Nice that you visit our site. Please indicate here which cookies we may place. The necessary cookies do not collect personal data. The other cookies help us to improve the site and your visitor experience. They also help us to inform you about our products. Are you going for an optimally working website including all the benefits? Then tick all the boxes!
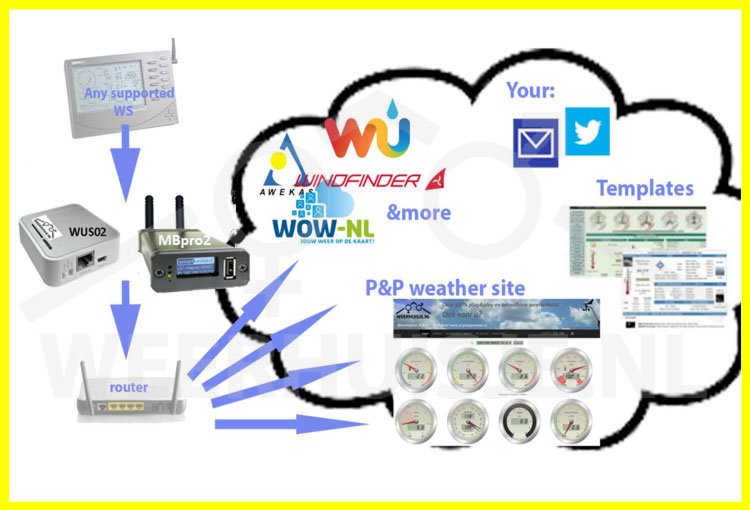
Meteobridge is a small energy-efficient upload server providing instant weather data available on the Internet. Your actual weather information available anytime, anywhere. Providing you as well as other weather enthousiasts an insight on your weather data. And conversely, you also can access weather data of other weather stations. An enrichment for weather enthousiast and professional user.
1.2 What does a Meteobridge do for you?
Have your weather data uploaded to (simultaneously and multiple) weather collection sites such as Weather Underground (wunderground) or Windfinder.
The Weerhuisje plug & play weather website has been specially made for use with the meteobridge.
Place automatic tweets on pre-set conditions.
Alerts via email or SMS when set threshold values are exceeded.
The Meteobridge also supports the use of e.g. the Saratoga and Leuven template. This requires some knowledge of HTML and scripting.
And there are more (advanced) possibilities with the Meteobridge (Pro).
1.3 Meteobridge and Davis
There are several ways to connect a Davis Vantage Pro2 or Davis Vantage Vue to a meteobridge.
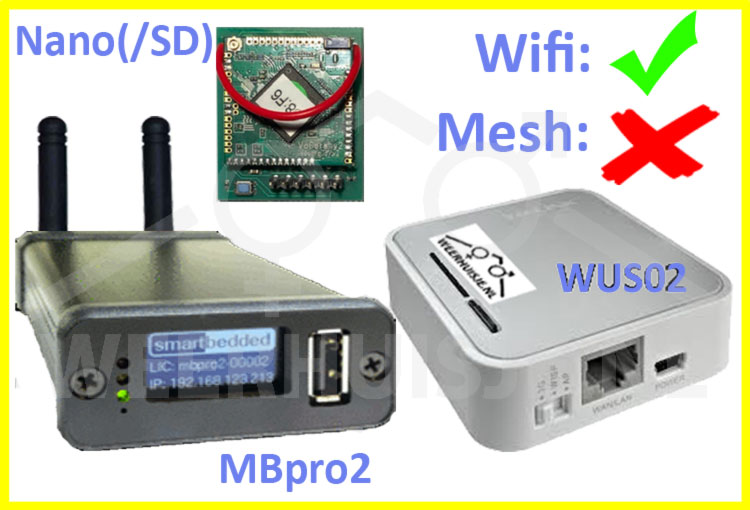
Meteobridge Nano (SD) - The simplest solution. Is seated in the console (or Envoy).
Meteobridge standard (WUS02) - You already have a Davis logger? Simply connect it to the WUS02 meteobridge.
Meteobridge Pro (black) - Connected via Davis 6510USB or Davis 6555 IP logger.
Meteobridge Pro+ (red) - Receive and upload weather data independently of your console.
Davis receiver vs own meteobridge receiver, the differences:
Data via Davis receiver (console, envoy) uses specific (calculated) values from Davis console such as:
Textual weather forecast.
ET (solar sensor required).
Data via meteobridge receiver (meteostick, meteobridge Pro +). Extensive possibilities for alternative configurations:
All 8 transmitter IDs can arbitrarily be configured as ISS, Instromet sun hours station, solar / UV etc ...
No console required.
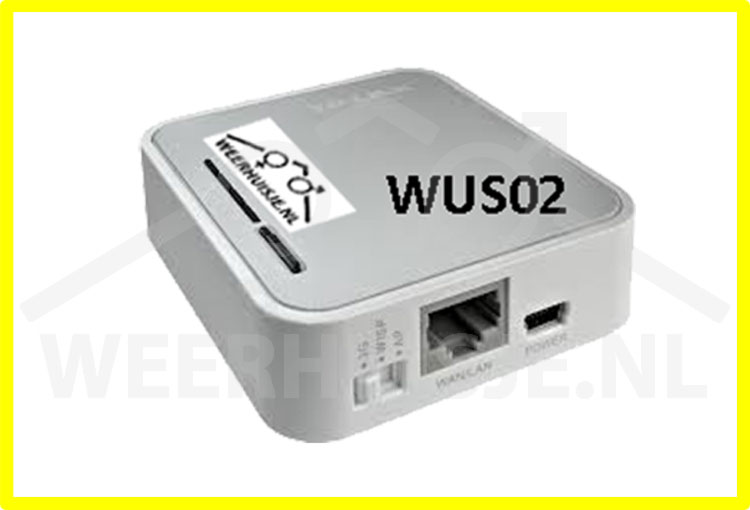
1.4 Meteobridge std (WUS02)
Weather data is forwarded to the desired internet locations.
System settings are loaded and activated via meteobridge server.
No own database. So no chance of database corruption. Very robust!
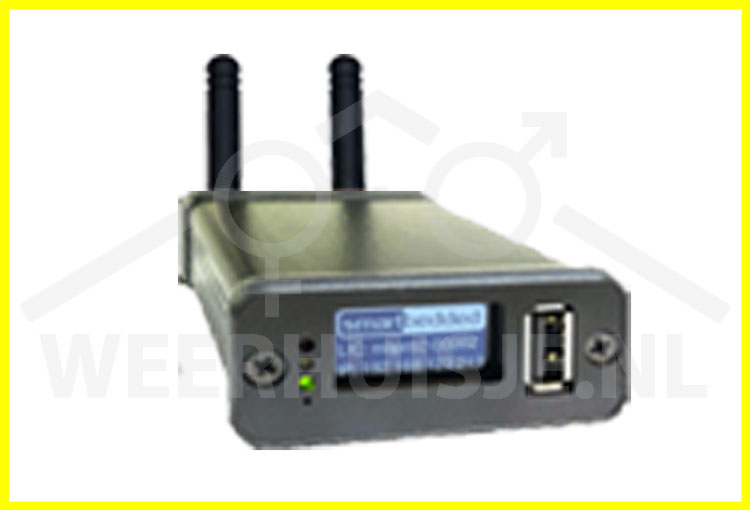
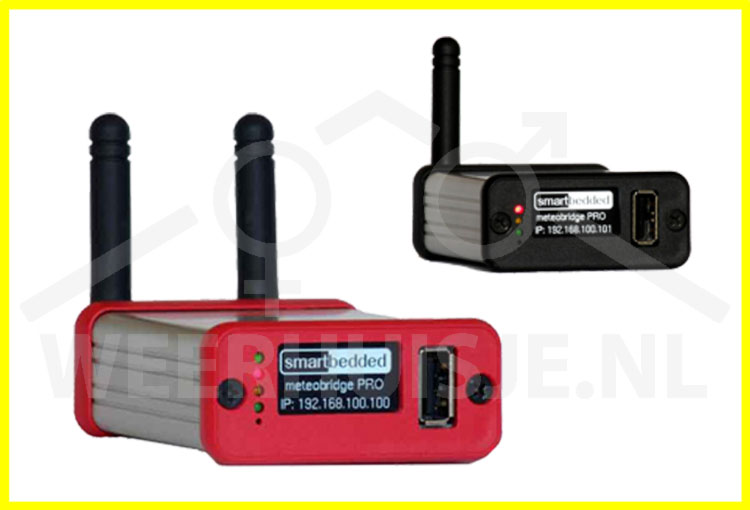
1.5 Meteobridge Pro WUS03 - Pro (+)
MB Pro black > No built-in meteostick (Davis receiver)
MB Pro red (Pro +) > With built-in meteostick (Davis receiver)
Own weather data storage > internal database.
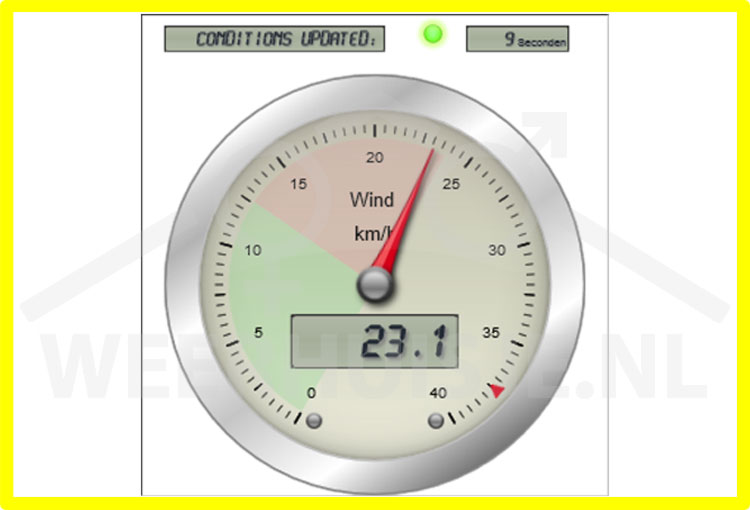
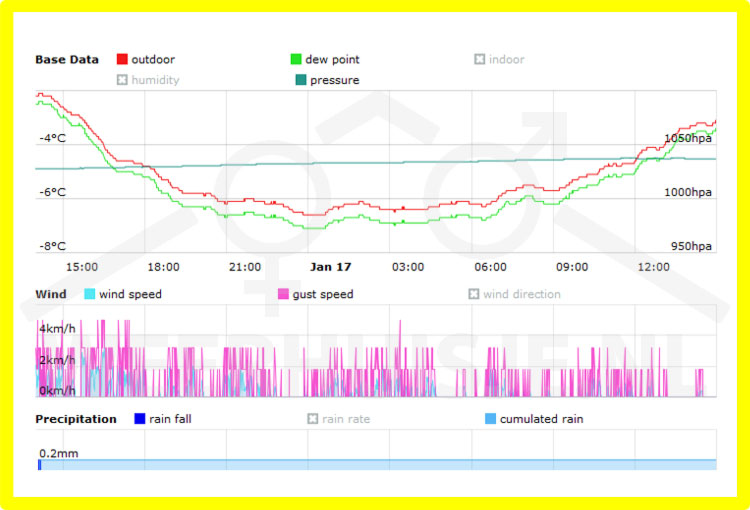
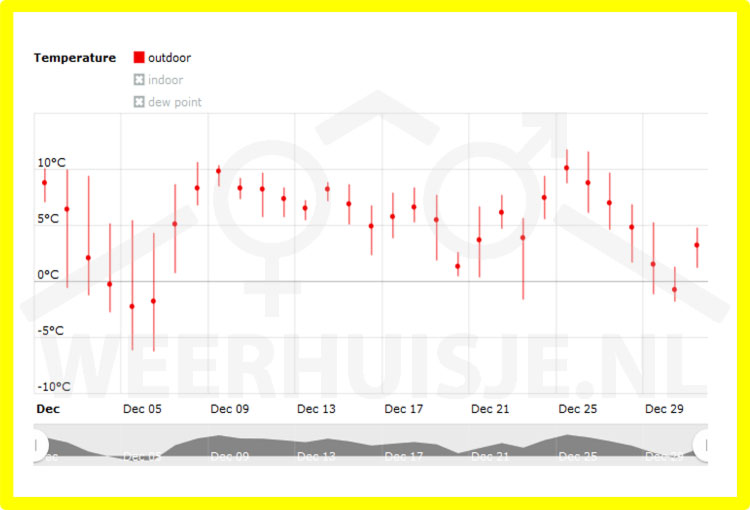
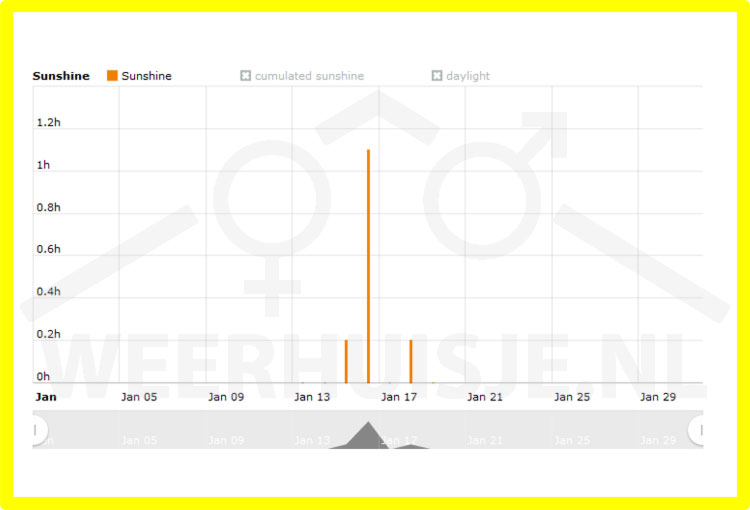
Autonomous generation of (extensive) graphs (have a look at the bottom of the page).
Display charts dynamically show/hide weather variables and time span.
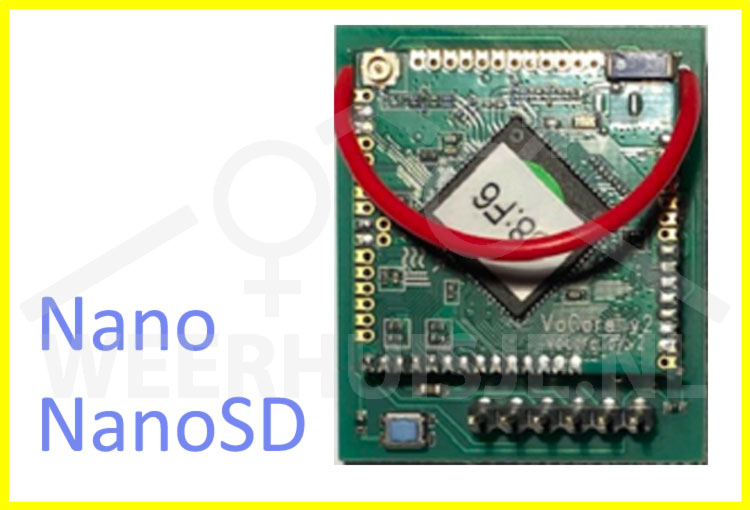
1.6 Meteobridge Nano
Meteobridge Nano is seated in the logger slot of a Davis console or Envoy.
Via local Wi-Fi network it connects to the internet.
Same functionality as the standard meteobridge. Only suitable for Davis stations.
With Davis logger memory chip. Existing weatherlink PC software can simply continue receiving the weather data. The Nano behaves like a Davis 6555 IP datalogger.
Meteobridge Nano SD (Pro)
With internal SD storage. Same functionality as the Meteobridge Pro.
Own weather data storage in internal database.
Autonomous generation of (extensive) graphs (e.g. at the bottom of the page).
Display graphs: dynamically show/hide weather variables and adjust time span.
Supported weather networks and weather stations
1.7 Weather networks
APRS
Open weather map
Previmeteo
Idokep
Weatherflow
Wetter.com
Weather cloud
Meteonews
Terre-net
Anything weather
Meteoplug Cloud Graphing
> For a complete list, visit www.meteobridge.com
Weather networks (cntd)
Weather Underground
Weather Underground CAM
Windfinder
WOW / WOW-NL / WOW-BE
Windguru
Meteobridge Weer CAM
AWEKAS
Wedaal
WeatherBug Backyard
WeatherForYou
CWOP
Weather Stations
Meteostick (Davis ontvanger)
Davis Vantage Pro2 , Pro1 (behalve firmware A ), Davis Vantage Vue, Envoy, Envoy 8x
La Crosse / ELV WS300PC/444/500 en diverse klonen ( WS550/777/888 , WDC7000 )
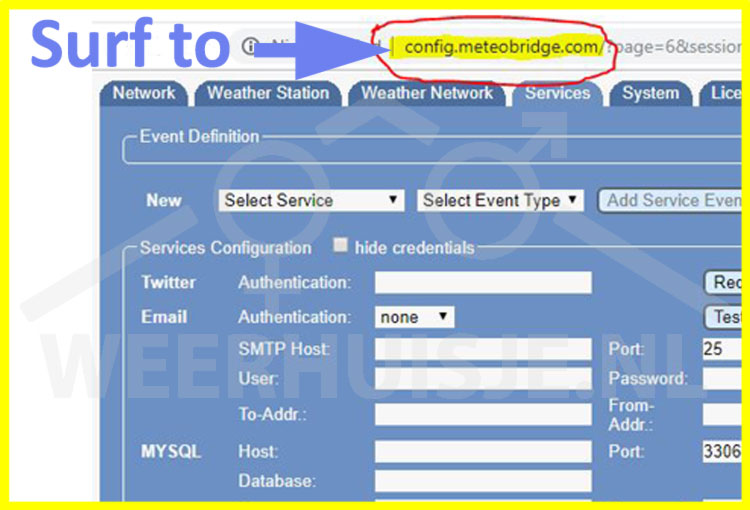
2.1 Meteobridge user interface demo
A demo user interface is available at config.meteobridge.com
There youwill find how easy you can make adjustments and activate functions yourself. The demo interface is not 100% complete. The "live data" tab, for example, is missing here. The options of the meteobridge pro are also not included in this simple demo. But you do get a good idea of how it works.
2.2 Meteobridge login
The meteo bridge is connected to the network, find below how to start the user interface.
Obtain the IP address of the Meteobridge.
Type in the address bar of your web browser: magicip.meteobridge.com (IP address can also be retrieved via the router)
Click on the link in the line on the screen (eg: "Meteobridge 'model' (MAC 1E: 12: 0A: 1E: 7E: 3B) with LAN IP 192.168.10.211 at - date / time -".
Enter the user name and password in the pop-up screen. Standard credentials:
Username: meteobridge
Password: meteobridge.
2.3 Activate internet access
In order to gain access to the meteobridge user interface outside of your own network (via a random internet connected computer), external access must be activated in the user interface.
Note: For security reasons we advise to change the login password.
Perform the following steps to gain remote access to the meteobridge.
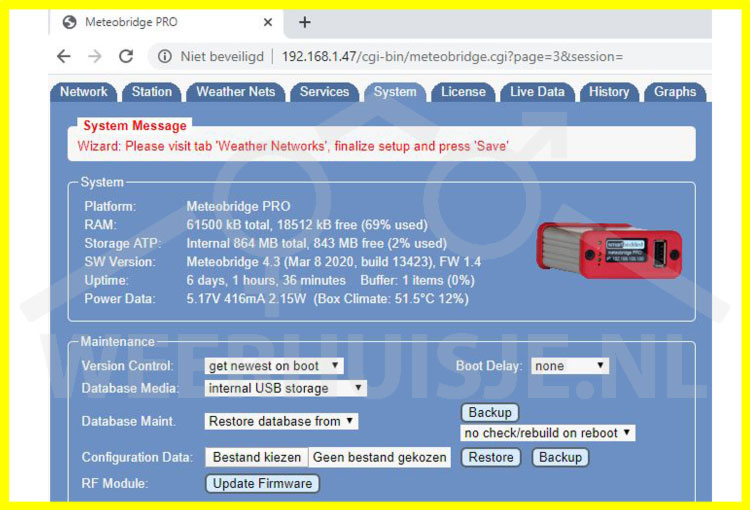
Login to the meteobridge and select tab "System".
In the 'Security' block, place a checkmark at "Internet login"
Click on "This URL" in the text behind the checkmark
With the https: // link that appears you can login to the meteobridge from the Internet.
2.4 Standard meteobridge reset options
The reset procedure for the standard meteobridge (TPlink MR3020 - white square box) offers 3 options.
1. Network settings restored to DHCP LAN mode (wired mode).
2. Reset user interface password WUS02.
3. Delete all settings and return to factory default.
The procedure:
Remove the mains voltage from the meteobridge and wait for 15 seconds.
Reconnect the mains voltage.
The LED of the RESET button starts to flash slowly.
When the LED starts to flash quickly, press and hold the RESET button.
The LED stops flashing:
Choose the correct reset:
Release after 1x flash: Network settings restored to DHCP LAN mode (wired mode).
Release after 2x flash: Password of user interface of the meteobridge will be reset to standard: meteobridge
Release after 5x flash: All settings back to factory default.
The video shows the last option. Be very careful with that, all user settings are lost and this can have major consequences!
2.5 Meteobridge Nano reset options
When NANO is stuck at blinking fast or LED is steady on you can do some reset operations by pressingthe small blue button on the NANO board next to the pin header. Which operation is triggered by pressing the button is determined by how long you keep the button pressed. When pressing down the button theLED will go off and will then start blinking slowly. You can now select a special reset operation by keeping the button pressed until a specific number of blinks is done.
These are the reset options to choose from:
Release button after first blink:
Resets password of WiFi access point that the NANO provides forinitial login. Password is set to “meteobridge” and NANO is rebooted
Release button at second blink:
Resets HTTP password to “meteobridge” and reboots
Release button at fifth blink:
Reset NANO to factory defaults (all settings are lost) and reboot.
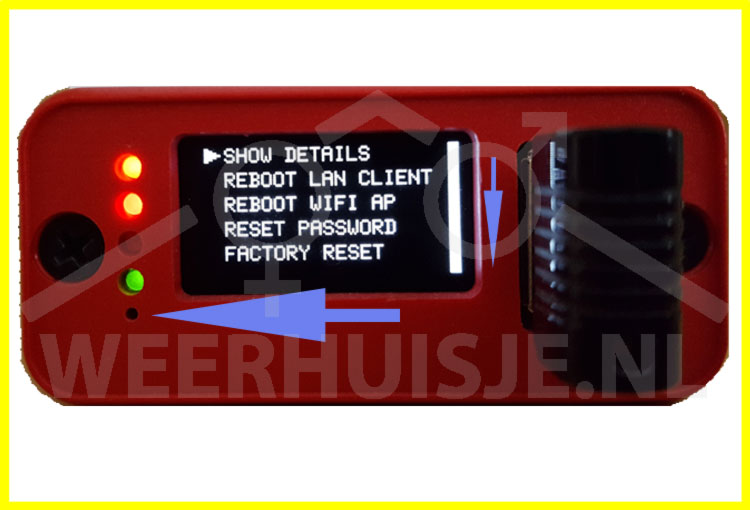
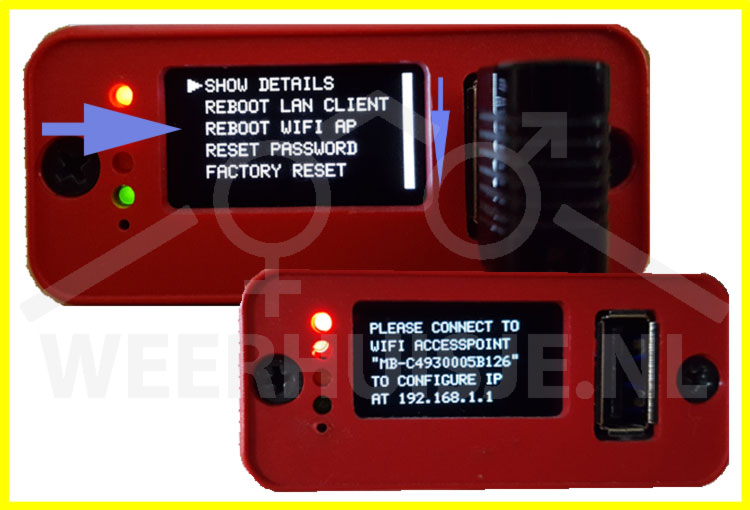
2.6 Meteobridge Pro(+) menu options
There is a pinhole under the LEDs with a push button behind it. Activate this with a paper clip.
The menu appears.
Menu
Show details
Shows details such as IP address and system variables.
Reboot LAN client
Restart the meteobridge via the network cable connected to the router.
Reboot WIFI AP
Restart the meteobridge in Wifi access point mode.
I.e. for configuring mobile network mode,
After restarting, a WIFI network "meteobridge ....." is available as WIFI network.
Reset password
Reset meteobridge password to "meteobridge".
Factory reset
Deletes all user settings.
Restarts with standard factory settings.
2.7 Proper shutdown of meteobridge Pro
The meteo bridge Pro (+) has its own internal database. Just shutting down the power supply can lead to the corruption of the weather database.
There are two ways to safely shut down the meteo bridge.
Through the user interface of the meteobridge:
Log in to the meteobridge and go to the system tab.
Press shutdown and wait until the display and LEDs are off.
Exit Meteobridge pro (+) without logging in to the user interface.
Press the pin hole under the LEDs with a paper clip.
Press and hold until the vertical bar on the right is completed.
"SHUTDOWN" appears on the screen.
Wait until the message disappears and the LEDs are off.
You can now disconnect the meteobridge from the power supply.
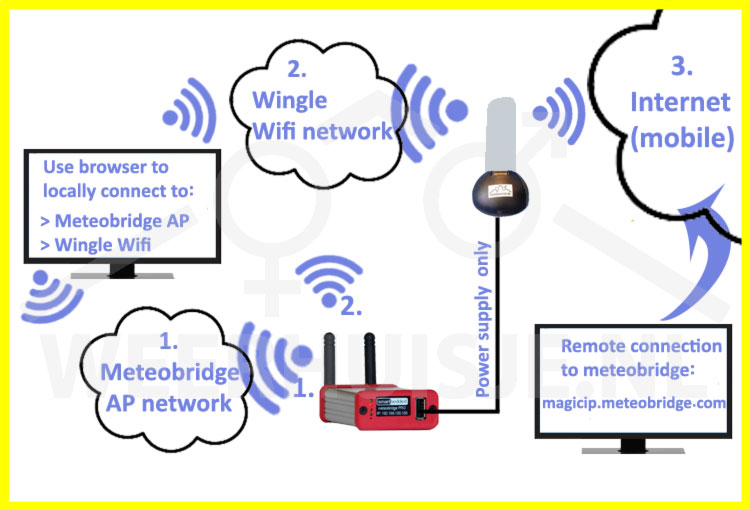
2.8 Wingle 3G / 4G setup (mobile Internet)
The adjacent picture schematically shows the various network connections. The Wingle (aggregation of Wifi and dongle) supports two networks. A local WiFi network and mobile network connection to the Internet.
The meteobridge can start itself with a Wifi access point (AP) network and can be set up to connect to the internet via the Wingle Wifi network.
Three networks:
Meteobridge Wifi access point network for the Wifi network settings of the meteobridge.
Wingle Wifi network:
For wingle (router) management using phone, tablet etc.
For connecting meteobridge to the internet.
Wingle connection to mobile Internet
Pay attention:
Use a SIM card without a PIN code !!
The wingle automatically creates its own WiFi network and also automatically connects to the mobile network.
The meteobridge uses the WiFi network of the wingle to connect to the internet.
2.8a Step 1
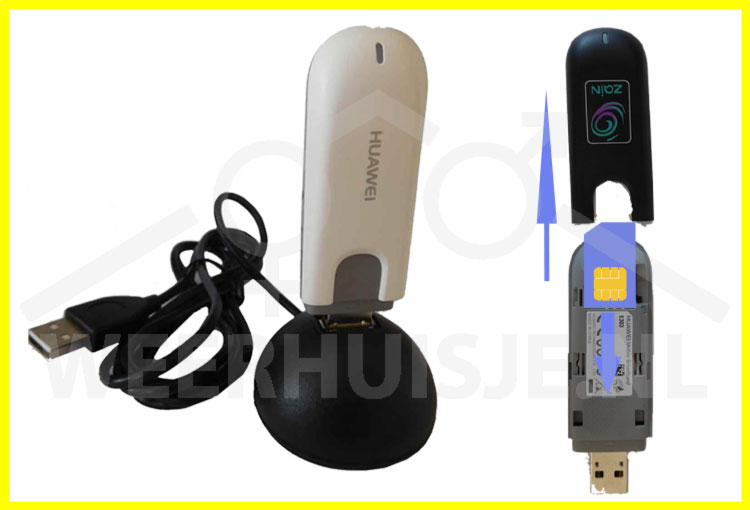
Insert SIM card in wingle.
Slide the side cover off the wingle housing (see Fig.).
Place the SIM card (without PIN code !!) in the wingle as shown in the picture.
Place the side cover back onto the wingle.
Place optional antenna (s) on the wingle (not included with each model).
Place the wingle in the supplied dock (see image).
Connect the USB cable from the dock to the USB connector on the front of the meteobridge.
The wingle only uses this connection for power supply.
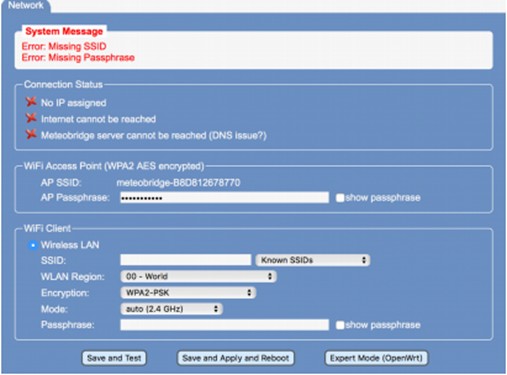
2.8b Step 2
Adjust WiFi network settings of the meteobridge (1.).
Activate the menu with the boot options (Howto: see respective item on this page).
Choose "REBOOT WIFI AP"
Wait until screen: "PLEASE CONNECT TO ...." appears.
Use a telephone or tablet etc to connect to the indicated Wifi access point.
Start a browser and enter the indicated IP address in the address bar.
Image (left) appears.
Under "Known SSIDs" select the WiFi network of the wingle:
Choose correct WLAN region and additional settings as indicated on img (left).
Enter the password for the Wingle Wifi network (2.) at: Wireless LAN > Passphrase.
Choose Save and Restart.
2.8c Step 3
After startup of the meteobridge, it connects to the internet via the Wingle WiFi network (Step 2).
Control and maintenance
You can now approach the operational system via a telephone, tablet, etc. for inspection and maintenance.
Meteobridge:
Both local and remote access via the internet is supported.
Locally connect to meteobridge user interface.
Connect your device to the WiFi network of the wingle.
Open a browser and enter in the address bar:
magicip.meteobridge.com> Click on IP address of found meteobridge or,
The local IP address of the meteobridge (view scrolling display).
(Remote) connection to the user interface of the meteobridge via the Internet.
To use remote login "Internet Remote Login" > tab: System, block: Security must be activated.
With "copy URL" the URL can be copied and saved.
Open a browser and enter the Remote login URL in the address bar.
Wingle router
Can be reached locally via the Wingle Wifi network. Connect to the SSID of the Wingle network. Then enter the IP address of the wingle in the browser address bar.
Nano WiFi setup
Install and get connection.
First install the NANO in the Davis console (or Envoy).
Remove the power supply and batteries.
Place the NANO at the location of the data logger and press firmly (no brute force).
Install the batteries and connect the power supply.
Keep your eyes on the Nano and check the startup:
LED turns on.
LED flashes slowly (starting your own operating system).
LED flashes quickly (starting up the meteobridge software).
LED on permanent
Search the WIFI connected computer, tablet or smartphone for network: meteobridge-… ..
Now connect to the meteobridge network. Password: meteobridge
Open your browser and type in the address bar: http://192.168.169.1
Login with username: meteobridge and password: meteobridge
Wait until meteobridge user interface appears (see image).
Setup WIFI options:
SSID: Click on [known SSIDs] and choose your WiFi network.
WLAN Region: Select your country
Encryption: Usually this is WPA2-PSK, otherwise consult the router setting.
Mode: auto (or your own preferred choice)
Passphrase: WiFi password of the chosen network
Click [Save and Test]
The following screen appears after about one minute.
The Nano is now successfully connected to the network.
"Connected to WLAN with IP 192.168.1.68"
This is the IP address of the Nano assigned by your router.
The current IP address may deviate from this example.
Now click on [Save and Apply and Reboot] at the bottom of the page.
The meteobridge restarts and is included in your own WiFi network.
During the start-up, the Nano displays an LED with different patterns.
Startup Led codes WiFi configured Nano
Blinking slowly: Loading internal software
Fast flashing: Connect to the internet and retrieve meteobridge software.
On: Startup completed, connected to internet.
The Nano is fully booted after about one minute.
Log in to the Nano
Open your browser (make sure your device is connected to your own local network again) and enter this URL (or the previously found IP address) in the address bar: magicip.meteobridge.com and press [enter]
A login screen appears:
Username: meteobridge
Password: meteobridge
The user interface of the Meteobridge Nano appears.
You now can get started!
2.9 Keep using weatherlink together with meteobridge.
Resolve the IP address of the meteobridge.
Check minimum SW version on the WUS02> system tab> system> SW version> Meteobridge 2.5 (xxxx).
SW version lower than 2.5? Get an updated license.
Open the Weatherlink program on your PC.
Go to Setup > Communications port
In the Communications block, select: TCP / IP
Select "Remote IP address" and enter the Meteobridge IP address.
Click OK. You can now download the weather data from the data logger.
3.0 Can connect but no upload
The WUS02 uses the standard port 80 for web pages. In some routers, outgoing traffic on port 80 is blocked, and this setting must be set to allow outgoing traffic via port 80.
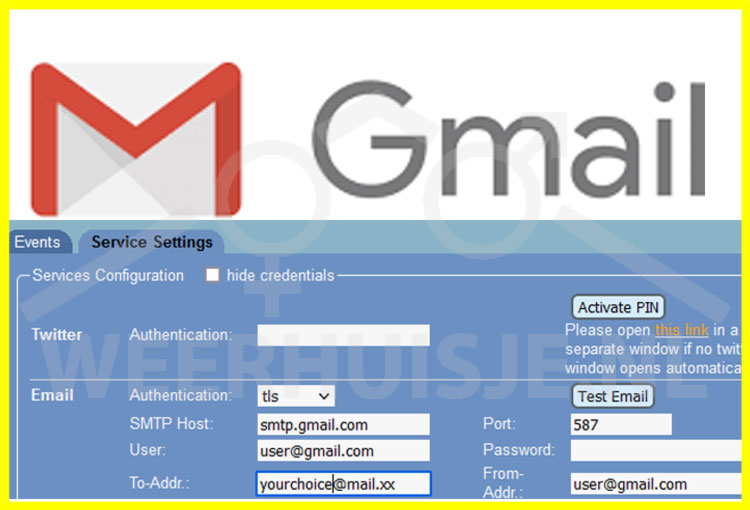
3.1 Mail settings Gmail
Gmail considers mails sent from an application (in this case the Meteobridge sw) as potentially dangerous. To use gmail in this case, the option "Access for apps with lower security" is available.
Make sure you are logged into your Google (mail) account.
Follow the link and click on "enable". https://www.google.com/settings/security/lesssecureapps
The setting is activated immediately.
Gmail configuration settings:
Authentication: TLS
SMTP host: smtp.gmail.com
Port: 587
User: user@gmail.com
Password: pw associated with "user@gmail.com"
Integrate customized widgets and templates on your own website. Meteobridge and/or Meteobridge Pro offer different options for this features. Creating the widgets is relatively easy. Weerhuisje.nl can also provide support.
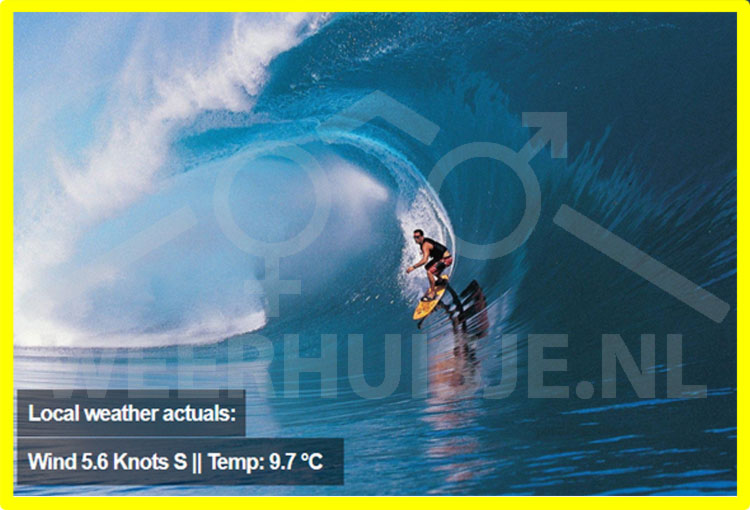
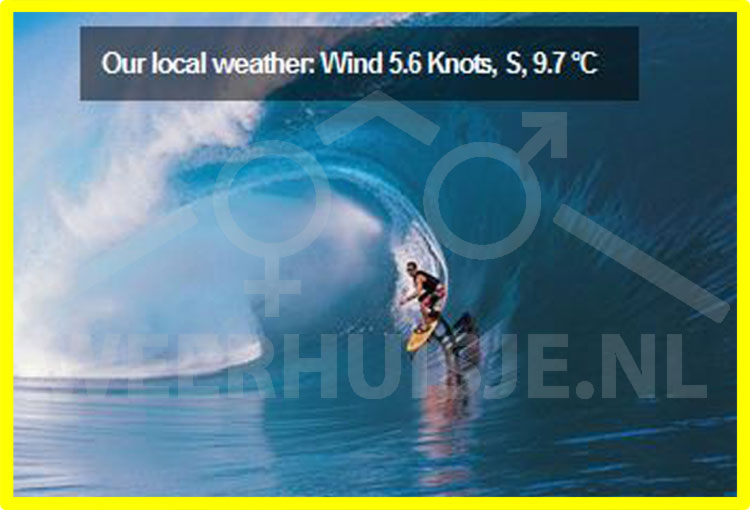
4.1 Text over image
Two examples of placing weather data text (with shadow) over an existing image on your site.
Here we use a HTML template with weather variables. The variables are replaced by current values per set interval and placed on the site via an FTP upload as an HTML file
Technique: HTML / css template
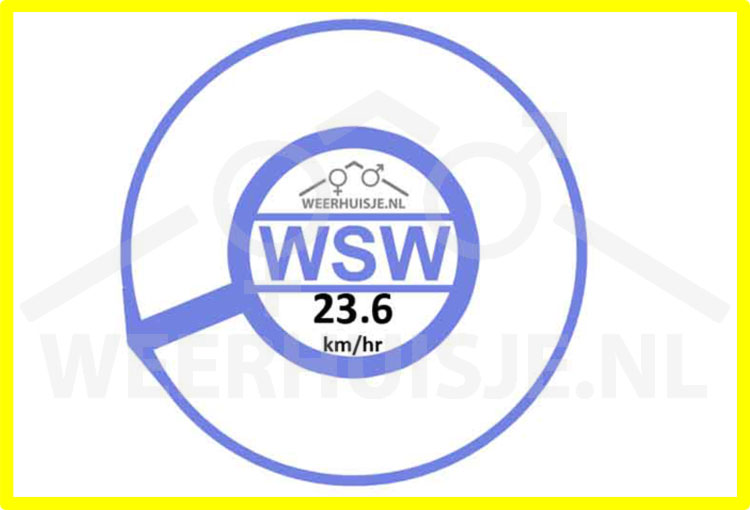
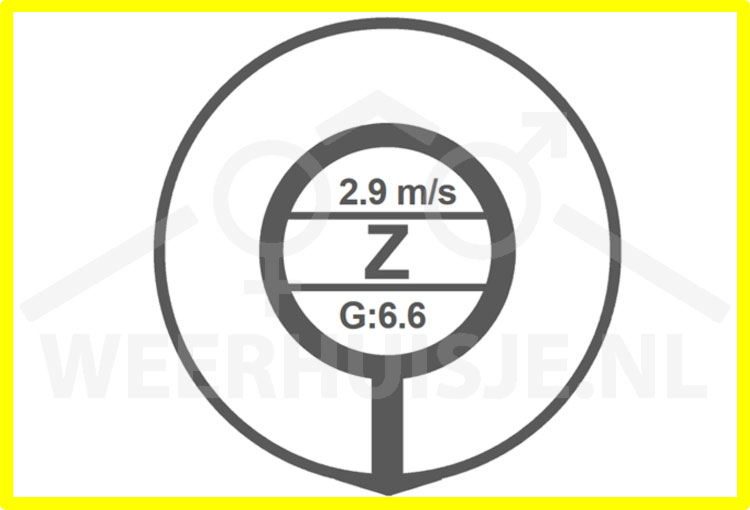
4.2 Wind rose (Languages: NL - EN - DE)
Extremely easy to implement wind rose. With or without text-over-image.
Left. Scalable windrose image to be inserted in your own website.
Right. Scalable wind rose image with text-over-image (in this example: speed)

 Nederlands